10 December 2008

a belated thanksgiving post...

well, if you hadn't guessed, thanksgiving came and went. it all happened rather quickly. it was a pretty fun holiday, though.


i was responsible for apple pie (*insert music of doom here*), pumpkin spice cupcakes, sweet potatoes, and grandma's cinnamon applesauce jello salad. that last one sounds a little weird, but trust me, its fantastic.

where to start...the sweet potatoes. i was thumbing through my november copy of bon appetit magazine, and came across this recipe for sweet potato and apple puree. okay so maybe it sounds a bit like baby food. and it sure is a stretch from the traditional mashed baked sweet potatoes with marshmallows on top, but i figured i'd give it a try anyway. i'm glad i did. the apples give it a bit of a tang, and the onions and cayenne pepper give it a nice bite. definitely recommend the recipe.

next, we'll go with the cinnamon applesauce jello thing. i've been eating this every holiday since i can remember, and have yet to grow tired of it. don't knock it til you try it, folks. seriously. look how pretty it is!

the recipe for this wonderful creation is as follows:

1 package lemon jell-o
2 oz. red cinnamon candies (read: red hots)
2 cups applesauce

bring 1 cup water to a boil. add cinnamon candies and stir over low heat until dissolved. remove from heat and add jell-o. once jell-o has dissolved, add 1/2 cup cold water and 2 cups applesauce. pour mixture into an 8x8x2 baking dish and refrigerate several hours.

and voila! there you have it.

alright next up we have the pumpkin spice cupcakes. (i think at this point you've realized i'm avoiding the apple pie explanation.) i've posted about these previously, so refer to that post for the recipe. however, i do have one edit. i replaced half the flour with wheat flour this time (actually because i ran out of white flour, but shhh.). surprisingly, it added a good deal to the taste of the cupcakes, almost making it a bit more muffin like. i enjoyed it. and here they are being all cute with my mom's adorable thanksgiving placemats:

notice i got all creative with the frosting this time. go me. (you'll have to excuse the slight sloppiness of the designs -- this was done with a ziploc bag, as i don't own any sort of appropriate frosting or decorating tools. and im not entirely sure i want to, as that obligates me to start making some really classy stuff :). of course it was a day later that i saw how you can make really cool designs with a ziploc if you reinforce it with tape and cut it a certain way...eh well.)

alright. now i owe you an apple pie. let me just say, i made a test pie earlier in the week. because well, i've never made my own pie entirely from scratch before. the test pie, while not the most beautiful thing i've ever seen, turned out pretty well.


see, not too shabby. i used a combination of granny smith and pink lady apples. good balance of tart and sweet. so on to the thanksgiving pie. well, remember how i ran out of white flour? yeah. i had to use wheat flour. i really do like wheat flour. its just not that great for baking, as i've just recently discovered. wonderful for pancakes, breads, muffins....pie crust? definitely not. the crust tasted very...wheaty. it wasn't terrible, but the first crust was MUCH better. initially, i was going to go with a lattice top. i got semi-lazy, and decided i wanted to use small cookie cutters on the top to make awesomely shaped holes in the crust. specifically, leaf-shaped holes. how fall-ish of me. it looked really cool pre baking, however i failed to consider that the less crust you have on top, the faster the pie bakes. so i left it in a little too long. and then you couldn't really tell that they were leaf-shaped holes. i wasn't going to show you a picture of my sort of embarrassing pie, but i guess i will. we all have cooking mishaps.


so there you have it. those were my thanksgiving dishes. i must share with you how wonderful my mom's dishes looked, though.


green beans, mashed potatoes, turkey, mommy, and rosemary sesame rolls, respectively.

the table settings were also adorable:


and there you have it. thanksgiving in a nutshell. i hope you all had a great one as well.

30 November 2008

Layer Cake Bakery

Ok folks, this time around we're switching it up a bit. Because when we're not cooking up a storm in the kitchen, what are we doing? We're looking for food to ogle at. Food to admire. Food to savor and enjoy. That is why we're doing a little departure from our recipe repetoire to showcase a little hidden neighborhood gem: Layer Cake Bakery. A week ago, I contacted the little bakery and asked them if we could come by and snap a few photos. Liz, one of the co-owners, obliged and off we went to Layer Cake.

I've been going there for months, almost since the place first opened up. The reason? Well, Mel and I live in Irvine, and if you haven't heard already, the main attractions around here are neighborhood safety, clone-like housing communities, and the (supposedly facilitated) lack of homelessness. I found a now defunct blog, stripped of frills and showcasing properties and businesses in Irvine. Layer Cake Bakery was one of those businesses, and being perpetually hungry for coffee and pastries, I decided to visit, since it was only a few blocks away at Barranca & West Yale Loop.

And oh what a gem I had discovered...


Layer Cake Bakery is a place whose specialty is hard to discern. That is to say, they have a plethora of items on their menu that shine with brilliance. From their rich red velvet and bold black forest cakes to their decadent chocolate-dipped macaroons and classic éclairs, each item is homemade and it shows through the flavor and texture.

You've also got to notice how pretty each little cake is:


They've also got a bunch more on their menu, including (but not limited to) brioche french toast, quiche lorraine, monkey bread, and trifles, so check out their website.

Mel and I decided to try a key lime tart while we were visiting. It was a very delicate tart with just the perfect amounts of smooth sweetness and refreshing tartness. Needless to say...


...it went quick. So the next time you're in the neighborhood, stop by for a bite. They've got a breakfast, lunch, or dessert (or all of them) that'll be on your mind for the rest of the day.

20 November 2008

Soboro Don

The other night I found myself craving something new and interesting. The problem was, as is the case these days, my hand. (It's broken, you know.) It has been the cause of a long case of foodie's block in the kitchen since sometimes you just can't have one hand doing the job of two.

Anyway, back to our state of affairs. I had an hour to shop before going to class/work, so I had to think fast. And after a brisk search of 'chicken' on Tastespotting, I found myself somewhat enamored by a picture of onsen tamago sitting comfortably on top of a mountainous bowlful of ground chicken. That, i would learn from [ No Recipes ], was called Soboro Don, and this is how I made it:


Soboro Don

1 lb ground chicken
1 tsp ginger
2 cloves garlic
4 tbsp mirin
1/2 tbsp sesame oil
1/2 tbsp vegetable oil
2 tbsp soy sauce
4 cups brown rice
2 green onion thinly sliced
2 eggs (I cooked them over-easy)
Shichimi pepper powder (optional for garnish)

- Heat the oils in the pan over medium high heat and add the garlic and ginger. Saute them until fragrant.

- Add the chicken and stir/saute. When there is no more pink visible, add the mirin and soy sauce. Continue to cook until the sauce has reduced by at least half.

- Put your hot rice in a bowl, and top with green onions. Then add a layer of the cooked chicken. Top with a dash of shichimi and a nice runny egg. (In my opinion, the runnier the better...)

- Don't be afraid to experiment with this dish! One of the best parts of this dish is the mutability of spices, sauces, and garnishes. Here's what I used, illustrated by Mel's artsy photograph:


And that's it. Even with one hand, I found this easy. Also, the sweetness of the mirin gives that taste that instantly transports you to your favorite Japanese restaurant. I couldn't help but think this was the perfect dish for a lazy weekday night...


...even for me and my bum hand.

13 November 2008

rugelach

so i'm a tuesdays with dorie wannabe. i don't own the cookbook yet, and i'm not part of the group (i've not decided whether or not i have time to bake consistently yet), but i really like 90% of the recipes that i see. i used to looove rugelach as a kid -- the only kind i had ever had though were apricot and raspberry, and so i felt the need to make them for myself. i also liked the idea of them being a little challenging, seeing as how they're not your typical "drop a spoonful at a time onto a baking sheet" type of cookie.

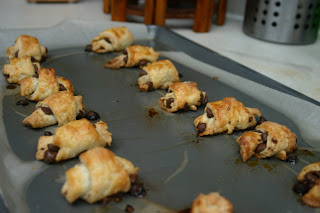
i decided to make the dough in the morning, and bake them at night. the dough was incredibly easy to make -- took all of 10 minutes. i had to let each half of the dough sit out for a bit in the evening when i took them out of the fridge though, cause it got a little too hard to roll out. i spent the entire day thinking about the filling, and decided on chocolate chips, nutella with almonds, and peach jam with cinnamon sugar. all three turned out wonderfully. my favorite were the peach jam ones, cause i got to use the jam my aunt had made with the peaches from her back yard. very tasty. if you use chocolate chips, i suggest crushing them up a bit - i kept them whole and they made the dough a little hard to roll up cause they were awkwardly lumpy.

you can find the recipe here -- try it. it's not as hard as it seems :)

chocolate chips just out of the oven:


jam or nutella.....couldn't decide. used both.
the peach jam ones leaked onto the cookie sheet. may not look great, but they tasted wonderful. :)


11 November 2008

cookie, anyone?

we were last-minute invited to a halloween party. i volunteered to bring cookies (since i was dying to try out the pumpkin chocolate chip cookie recipe i'd found), so while we passed out candy to the kiddies (and wow, do they show up early now. our first ones were at 5:30!) i baked a batch of these wonderful cookies. the texture was something i'd never had in a cookie before - very cake-like. it was interesting and quite frankly, perfect for a pumpkin cookie. highly recommended.

i was inspired by dishing up delights to try this recipe.

Pumpkin Chocolate Chip Cookies

1 cup pumpkin
3/4 cup sugar
1/2 cup canola oil (i used vegetable and it worked just as well)
1 egg, lightly beaten
2 cups flour
2 tsp baking poder
1 tsp cinnamon
1/2 tsp salt
1 tsp baking soda
1 tsp milk
1 cup chocolate chips
1 tsp vanilla

preheat oven to 375 degrees. dissolve baking soda in milk and set aside. in large bowl, whisk together pumpkin, sugar, oil, vanilla and egg.

in a small bowl, stir together the flour, baking powder, cinnamon and salt. add the dry ingredients to the pumpkin mixture and then stir in the baking soda mixture and then the chocolate chips. spoon onto a cookie sheet, and bake 12-15 min until done.


what the heck is 'orzo'?

so at work, i've become known as "the one who cooks a lot." people have a habit, as it gets closer to the end of the day, of asking me what i'm going to cook for dinner. sometimes i have something planned out (you know, the hour of work time i wasted searching for a new recipe), and sometimes i really have no idea. this particular day, i had planned to make ina garten's roasted vegetable orzo for dinner. question time came, and i gave my response. and no joke, 8 out of 10 people said in response, "what the heck is orzo?" i guess sometimes i forget that most people aren't as food-curious as i am. and some people eat their meat and potatoes, and thats the end of their culinary adventures. i had always thought of orzo as normal. i guess its not.

for those of you who are at the very beginning of your culinary adventures, orzo is rice-shaped pasta. put an emphasis on the shaped, as it's not made out of rice. at all. its made out of a type of semolina, actually. its most often used in soups, but can be used in many other dishes as well.

anywho, ina garten's recipe was delicious. you can use whatever roasted vegetables you like in this, although her suggestions are great too. i added zucchini to mine. the lemon-olive oil dressing was very good, too. i left out the feta cheese and pine nuts as well. i didn't really mean to leave the pine nuts out, i just forgot to pick them up at the store. and the cheese...well...we all know i don't like cheese.


comfort food.

ahhh comfort food. you know, the stuff your parents have been making for you since you could eat solid food. once you leave the nest, its the stuff you always want when you've had a bad day, or its cold outside and you just want to be cozy. usually, comfort food involves a fairly simple dish. a stew, a casserole, some kind of pasta. this is one of my favorites. it's been one of my favorite dishes since i was very little.

mommy's tuna casserole

2 cans cream of mushroom soup
1 lb of pasta
2 cans of tuna
fried onions

all you've got to do is cook the pasta until its al dente, mix the pasta, tuna and mushroom soup together, put in a rectangular baking dish, sprinkle the fried onions on top, and bake at 350 for about 20-30 minutes. best when served with salad and garlic bread. but good by itself too. :)

09 November 2008

Namesake Dishes, Part 2: Stuffed Bell Peppers


So this one's been a recurring favorite in our kitchen these days. Why? because it's absolutely delicious despite its ease in the kitchen. Some more added perks include the flexibility of ingredients, laughably easy cleanup, and the fact that's it's a pretty healthy dish.


Stuffed Bell Peppers

4 bell peppers (yellow and orange are our favorites), with tops/seeds removed.
1 lb ground beef
1 onion
1 15 oz can black beans
1 15 oz can diced tomatoes
salt
pepper
2 cloves garlic
red & brown rice

-Preheat oven to 350 degrees.
- Chop off the top of the bell peppers and de-seed them thoroughly.
- Chop the onion and garlic and set those aside.
- Brown the ground beef in a pan.
- To the browned beef add salt, pepper, garlic, and onion. Cook until the onions get a little softer. You can add any other seasonings you'd like here. Get creative!
- Add black beans and tomatoes.
- Let mixture cook for 5-8 minutes more.
- Place bell peppers open side up on a foil-lined cookie sheet.
- Fill peppers with beef mixture and bake for about 25 minutes.
- Serve with cheese on top (optional) and rice.

As you can see, we love to use lots of great colors in this dish, namely the yellow and orange peppers. They offer a good combination of the sweetness of red and the resonant flavor of the green. On top of that the flexibility in seasonings add tons of dimensions to the remake value of the dish.


(edit: another thing nice about this dish is it gives us a perfect excuse to go in the backyard and get all artsy...)


oh pumpkin...

i can't stop cooking with pumpkin. sadly, i've not gotten to use fresh pumpkin all season. in fact, i didn't even get to carve one for halloween. sad. 

brandon had a potluck last weekend. and well, a broken hand isn't the easiest thing to cook with. so he half-asked and i half-volunteered myself to make something. something for dessert. 

a recipe for pumpkin spice cupcakes (yes, cupcakes, not muffins) was brought to my attention a few days earlier, and i decided this was the perfect opportunity to try it. i had also never made cream cheese frosting before, so why not learn something new?

the recipe was from martha stewart, but i found it on tammi's food blog, running with tweezers.
 
Pumpkin Cupcakes
  • 2 cups all-purpose flour
  • 1 tsp baking soda
  • 1 tsp baking powder
  • 1 tsp coarse salt
  • 1 tsp ground cinnamon
  • 1 tsp ground ginger
  • 1/4 tsp fresh nutmeg
  • 1/4 tsp allspice
  • 1 cup brown sugar
  • 1 cup granulated sugar
  • 2 sticks unsalted butter, melted then cooled
  • 4 large eggs
  • 1 can (15 oz) pumpkin puree
  1. preheat oven to 350. line cupcake pans with paper/foil liners. in a medium bowl, whisk together flour, baking soda, baking powder, salt, cinnamon, ginger, nutmeg and allspice.
  2. in a large bowl, whisk together brown sugar, granulated sugar, butter and eggs. add dry ingredients and whisk until smooth. whisk in pumpkin puree.
  3. divide batter among liners, filling each about half full. bake until tops spring back when touched and a toothpick inserted in the center comes out clean; about 20-25 minutes. 
once the cupcakes have cooled completely, frost! i found a generic cream cheese frosting recipe and used that. a piece of advice for you: use half the amount of sugar in your cream cheese frosting. its quite fantastic and not as sickeningly sweet as it is with the full amount.

they came out beautifully, and were incredibly delicious. apparently they got devoured at the potluck. and the roomies got the ones that didn't make it to the potluck, and those were gone within a day too. i plan to make them again for thanksgiving, i think.

cupcakes under romantic lighting <3


up close and personal


we have returned...

you may have noticed we've been on a slight hiatus. long story short, brandon broke his hand. therefore, there's been little motivation to update. that and because after cooking and washing dishes, i get lazy and don't want to do anything remotely involving work.

anyway, there are several recipes to post. lets begin, shall we...

okay, so...lets just get this out there. i don't like cheese. i really don't. i used to. but now it just makes me kinda nauseous. brandon really likes cheese. so i feel bad once in a while because i never cook with cheese. parmesan chicken was my attempt to incorporate a bit of cheese into the cooking, because i was feeling particularly nice. it's like he knew i was going to cook with cheese. he came home with flowers for me. :)

the recipe is very easy, even for someone who has never breaded anything before (me). all you need is some chicken (duh), an egg, a little water, parmesan cheese, some flour and some breadcrumbs (i used italian style panko breadcrumbs...they were fantastic).

Preparation:
  1. beat 1 egg with a tablespoon or so of water. you're going to have to put the chicken in it, so find a container/bowl/plate that will work for that.
  2. mix 3/4 cup breadcrumbs and 1/4 cup freshly grated parmesan and spread out on a plate
  3. mix 1/2 cup flour with some salt and pepper and spread out on a plate.
  4. cut chicken into whatever size pieces you'd like. you can do the entire breast, strips, nuggets...pretty much whatever you want.
Coat each piece of chicken in flour, then in the egg mixture, and then in the breadcrumbs mixture. Once you've done this to each piece of chicken, heat up a tablespoon or two of olive oil and a tablespoon of butter in a pan until the butter melts and the olive oil is hot. place the chicken in the pan, and cook for a few minutes on each side. the smaller the pieces, the shorter the cooking time. make sure you watch your chicken though, you don't want to burn the breadcrumbs.

this dish goes really well with almost any kind of vegetable. i've made it with sauteed spinach, salad, etc. i decided to try roasted asparagus this time. heat oven to 350, drizzle olive oil over asparagus, season with a bit of salt and pepper, and cook for about 20-25 minutes. you can vary your cooking time depending on the texture you prefer.


09 October 2008

Namesake Dishes, Part 1: Bok Choy & Friends


Ahhh, the serene calm of the kitchenscape. This is the kind of thing I signed up for: a true sense of freedom and release, the calm strength of creating something from the barest of raw materials. Like a freshly harvested box of corn starch, or a plastic tub of tofu, fresh off the vine. Er......


There, that's more like it.

Anyway, on the menu a few nights ago was a big question mark. Mel had been putting a lot of effort in the kitchen (and into this blog) for the past couple of days, so it was my turn to step up to the plate. I felt like a serious foodie that day. Since I had class and work all day, I spent all my free time thinking up a recipe for later that night. In the end I came up with this:

Bok Choy & Friends Stir-Fry

You'll need:
2 medium-sized heads of bok choy
1 head of napa cabbage
1 brown onion (chopped)
1 brick o'tofu (14 oz or so) (cut into cubic inch pieces)
4 sprigs of green onion (chopped)
3 cloves of garlic (roughly chopped/minced)
3 tbsp soy sauce
3 tbsp oyster sauce
2 tbsp kecap manis (sweet soy)
2 tsp cornstarch
1/3 c. water
1 tbsp vegetable oil

(Disclaimer: these amounts were experimental, so don't be afraid to make little changes!)

-First off, combine the soy, sweet soy, oyster sauce, and the chopped garlic and green onions into a medium sized bowl. Stir them around a bit. Add the tofu to the bowl, then stir around again, making sure the get each piece of the tofu a turn in the sauce bath.

-Don't forget to start cooking the rice! For this dish I like to use brown rice because it soaks up the flavors from the sauce pretty well.

-At this point, I'd advise you to chop everything else. That way, you don't have to worry about how fast you'll have to go and you give the tofu a chance to have a first class soak.

-Chop the bok choy perpendicular to the grain of the stalk. I like to keep the pieces to about 1 inch in width. Separate the leafy bits from the stalky bits. I used only the leafy bits from the napa cabbage, and put them together with the bok choy leaves.

-Heat the vegetable oil in a deep skillet over medium to medium-high heat. Make sure the pan is hot, but not smoking.

-Toss the onions in for a little while to get them started, then after about a minute or two, put in the bok choy stalks. Toss them a little to spread the oil, but then don't touch them again for about 2 minutes.

-While waiting for the bok choy, mix the cornstarch and water in a separate cup.

-Add the leafy bits to the skillet and stir-fry for 1 minute or until you notice the leaves start to wilt.

-Add the tofu/sauce mixture and the water/cornstarch mixture and continue to stir-fry. (Some recipes call for some butter here, to add richness. Mine tasted good both with and without it, but if you do decide to add some, I'd say you don't need much more than 1/2 tbsp)

-Stir-fry for 2-4 minutes more, or until leafy bits are adequately wilted.


In the end, our tummies full of goodness and home cooking, we decided to try and cook more with kecap manis (a sweet soy sauce that is used a lot in traditional Indonesian cooking). The flavor of it adds a certain kick to dishes and is the only sweet thing I know that exclusively tastes good with savory foods. For now, though, our venture into the world of stir-fry left us very satisfied.

--BG--